Showing posts with label Crochet. Show all posts

Monday, March 18, 2013

Crochet Stitch Instruction:Woven Stitch


I find myself using this stitch over and over. It makes a nice thick fabric that's great for pillows, dish cloths and coasters.


Even number of stitches.
Row 1: SC in 2nd ch from hook, *1 CH, skip 1 ch, 1 SC in next ch, repeat from * to end, turn
Row 2: 1 CH, skip first sc, *1 SC in 1 ch sp, 1 CH, skip 1 sc, repeat from *, ending 1 SC in 1 ch, turn
Repeat row 2.


Pattern adapted from “The Crochet Stitch Bible”, Betty Barnden, which is one of my favorite crochet stitch anthologies. No matter what I'm looking for I always seem to find something that I can use.

Wednesday, June 13, 2012

My Favorite Free Patterns: Hats to Knit & Crochet

A list, with photos, of my favorite free patterns to knit or crochet hats.There are so many lists of free knit and crochet patterns out there, but they usually don't have photos. So here's a quick list of what I think are the best free patterns out there. Leave me a message below with a link to your favorite if you'd like to add it here.

Easy Slouchy Hat
This is the hat I've knit the most. It can be finished in an afternoon and using variegated yarns make it look much more complicated than it actually is. The pattern is available as a free Ravelry download. It's shown here in Twisted Sister Jazz yarn. I used two colors (60 & 69) and alternated with two rows of each color throughout the hat. I've also seen it knit up in Blue Sky Alpaca Organic Cotton (if you're on Ravelry you can see a photo here), Malabrigo Rios (Ravelry photo here), Debbie Bliss Andes Alpaca Silk (Ravelry photo here).

La Parisenne
I love the zigazaggy stripes of this one. the pattern calls for a yarn called SockPixie Sock yarn. The free knitting pattern for this beret can be downloaded here.It appears to be knit with an artisan dyed yarn that isn't available currently. I of course will go to one of my favorite yarns for striping, Noro Kureyon Sock Yarn or Noro Silk Garden Sock Green/Aqua/Brown.

Undergrowth Hat on Knitty
I love Knitty. But I even find it frustrating. Entering a search for "hat" brings up a list with no pictures. And of all the hats on the site, Undergrowth is the one I want to remember. (Download for Undergrowth Free Knit Hat Pattern is here.)  It calls for 1 skein in each of two colors of Brown Sheep Nature Spun Sport (colors pictured are #103 Deep Sea & #N003 Grey Heather.)


Lollipop Hat by Brittany Tyler
This is a fun hat that looks like it will be fun to knit. The instructions, available to download from the Tangled webzine, say it can be knit in up to 8 different colored stripes, making it a good project for using up leftover bits.

Tortora Hat on Knitty
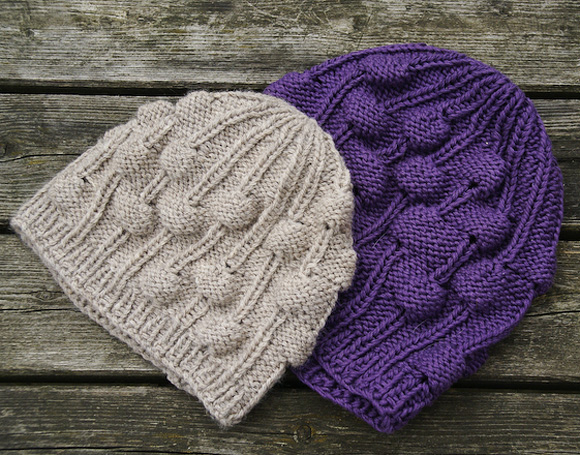
Bobbles are one of my favorite stitches. Another Knitty option (free download for the knitting pattern is here), this knit hat mixes bobbles and stripes in an interesting way. It calls for 1 skein of Lana Grossa Alta Moda Alpaca Yarn and has versions for both a typical beanie and a slouchy toque.

Hatticus by Susanna Celso
A great cable pattern knit out of a bulky yarn, the Hatticus knit hat by Susanna Celso is available as a free download on Ravelry with notes on her blog. It's shown here in Cascade Magnum, requiring about 80 yards according to her notes.

Saturday, May 19, 2012

Crocheted Bag with Traditional and Freeform Elements

Finished Freeform Crochet Bag


My daughter came home from this summer describing a bag she had seee someone carrying and wanted me to recreate. Not being a knitter or crocheter, she went to my closet & pulled out my Granny Square Bag (instructions are here)


and said it was the opposite of that. Or at least that how she thought she saw it. Maybe. The bag should be striped and the straps should be squares. And it should look great with her favorite coat, which is a mix of about 10 different prints.


I pulled out my box of needlepoint yarn scraps and chose a palette..


Granny Squares for the Strap


I knew she wanted the straps to be squares, so I did a simple 3 round granny square (pattern is here. )That went really quickly, but the body stumped me.


figuring what colors will go with the straps
beginning of the body


After playing around with a few different options and flipping through many crochet stitch books I settled on the Single Crochet - Zigzag pattern from Sasha Kagan's "Crochet Inspiration." I did random colors on the striping, with mostly single rows of a color, but occasionally I did a couple of rows of a color.


At this point I stitched the bag to the straps. I then did a sort of controlled freeform flap piece that I stitched onto the back of the bag.

Freeform-ish flap piece on the blocking board.

Back of the bag

Finished bag, with coat.
I lined the whole bag with an old sweater that I threw in the washer & felted. My daughter tends to use her bags with gusto, so I was sure to use very strong stitches and a heavy lining. There's a lot going on with all the patterns in the coat and bag. But she's happy!

Friday, March 30, 2012

Basic Crocheted Square Pattern

This is a generic crocheted square that can be made any size by varying how many rounds you make. It's not as open and lacy as a traditional granny square which makes it more suitable for things with a denser texture. I used it for the straps on a bag I made.

Finished Basic Granny Square (3 rounds)

Instructions on how to crochet a basic granny square:

TIPS:
Keep a smaller hook nearby to use when weaving in ends and attaching new colors to your work. It seems to be easier, especially through the many stitches around the ring.
Work your ends in as you go. It seems like an almost insurmountable task if you wait until all your squares are finished. And it's just nicer to work on neat tidy squares without all sorts of strings dangling.

INSTRUCTIONS:
Start with a sliding ring. Interweave has a nice visual tutorial with good pictures of this prcess on the crochet me website.

Basic Granny Square - Round 1
Round 1: Ch 4, 3 dc in loop, [1 trc in loop, 3 dc in loop] 3 times, join to 4th ch of beg ch 4. Fasten off.

Basic Granny Square - Round 2


Round 2: Join new color at one of the trc. Ch 3, 1 trc and 1 dc in same st as joining, [(1 dc in next 3 dc), (1dc, 1trc, 1dc in next trc)] 3 times, 1 dc in next 3 dc. Join to 3rd ch of beg ch 3. Fasten off.

Basic Granny Square - Round 3


Round 3 and subsequent rounds: Join a new color at one of the trc. Ch 3, 1 trc and 1 dc in same st as joining. For rest of round, 1 dc in each dc and 1 dc, 1 trc, 1 dc in each trc. Join to 3rd ch of beg ch 3. Fasten off. 

I've made this square as large as 12 rounds. It's a good one to use on "Babette" style blankets and scarves. (I've got a diagram for different sized squares made into a blanket here.)

No matter how carefully I stitch I find my squares curl and and are uneven. A few minutes of blocking makes assembly much easier. I pin the squares (at about every inch) onto a Quilter's Board and float over them with a steam iron, not actually touching the squares with the iron, just letting the steam float down onto them. They'll be dry in an hour or so & ready to much more easily assemble. (Especially if you've faithfully woven those ends in all along!)

Basic Granny Square - blocking
I've found I use my Quilter's board constantly. They come in a few different sizes, have a handy carry handle and are a perfect size to pop onto the kitchen counter for quick pressing or blocking.


This is my favorite one.
It's 14" x 22" and has a rulered cutting surface on the back to use with rotary cutters or x-acto knives.

A slightly smaller (about 14 1/2" x 15 1/2") and cheaper option is this one, which is also great to take to classes and workshops.
 

I've got a couple of each as I always seem to have about 5 projects going on at a time.

Thursday, March 15, 2012

Crocheted Granny Square Bag

Crocheted Granny Square Bag with Striped Strap


I used odds and ends of needlepoint wool & washed it in warm water in the machine to full it a bit. I found a piece of vintage knit boucle from my grandmother’s stash for the lining. Yes, it took me three years to finish this one… A day to crochet it, a day to line it and 3 years of it lying around in the “to do” pile.

The squares are made by doing 5 rounds of a traditional granny square pattern as follows:

Main color is used for Rnd 5 to edge each square.

Make 12 squares using different color combos (no two squares alike!) on the first four rounds


Ch4, join with sl st to form a ring.

Rnd 1:Ch 3, 2 dc in ring, ch 3, * 3 dc in ring, ch3. Rep from * 2 more times. Join and break off on this and every rnd.

Rnd 2:Join yarn in any ch-3 sp, ch 3, work 2 dc, ch 3 and 3 dc in same sp, * ch 1, work 3 dc, ch 3 and 3 dc in next ch-3 sp. Rep from *2 more times, end ch 1.

Rnd 3:Join yarn in any ch-3 sp, ch 3, work 2 dc, ch 3 and 3 dc in same sp, * ch 1, 3 dc in next ch-1 sp, ch 1 work 3 dc, ch 3 and 3 dc in next ch-3 sp(corner). Rep from * around end ch 1.

Rnd 4:Join yarn in any ch-3 sp, ch 3, work 2 dc, ch 3 and 3 dc in same sp, * (ch1, 3 dc in next ch-1 sp) twice, ch 1, work 3 dc, ch 3 and 3 dc in next corner sp. Rep from * around, end ch 1.

Rnd 5:With Main Color, sc in each dc and in each ch-1 sp, working 3 sc in ch-3 corner sps.

Create the strap by doing random colors of single crochet in the desired width (I did a 2" width) and length.

Assemble the bag by first joining 6 squares together for the front, and 6 together for the back.

Sew the ends of the strap together, Then sew onto the front and back. Cut lining to fit and attach with blanket stitch.

These are my working notes, and hopefully correct, accurate and understandable. And feedback is welcomed!


Wednesday, November 2, 2011

Featured on Crochetvolution

A photo of my afghan is featured in an article - 5 tips for getting started in Freeform on Crochetvolution.

Click here to see weekly notes on how the blanket all came together.


Sunday, August 21, 2011

Bobble Granny Square

Four Rounds of Bobble Granny Square


BOBBLE GRANNY SQUARE

Starting with a round of bobbles, this square begins as a circle for the first two rounds. The third round squares it up. Rounds continue in the same way until desired size.

ABBREVIATIONS & STITCH INSTRUCTIONS:
sl st: Slipstitch
dc: Double crochet
Bobble: wrap the yarn around the hook, insert the hook into next spot, pull a loop through, wrap the yarn around the hook, pull through the first 2 loops. Repeat 2 more times into the same spot. Wrap yarn around the hook all pull through all (4) loops. Work 1 ch to close.
For instructions on basic crochet stitches see: http://www.crochet.org/lessons/lessonr/lessonr.html

TIPS:
Keep a smaller hook nearby to use when weaving in ends and attaching new colors to your work. Seems to be easier, especially through the many stitches around the ring.
Work your ends in as you go. It seems like an almost insurmountable task if you wait until all your squares are finished. And it's just nicer to work on neat tidy squares without all sorts of strings dangling.

INSTRUCTIONS:
Start with a sliding ring. (go to http://www.crochetme.com/forums/t/28917.aspx for instuctions.)

Round 1: 3 ch, 2 dc into the ring(this will count as your first bobble), chain 1.
*Work 1 bobble stitch (see above) into the ring, 1 ch.*
Repeat between ** 6 more times (8 total bobbles.)
Sl st in 3rd of 3 ch at the beginning of the round. Fasten off. Tighten sliding ring and weave that end in.

Round 2: Join yarn in ch space, 3 ch, [2dc, ch1] in same space. [3dc, ch1 in next ch space] 7 times. Sl st in 3rd of 3 ch at the beginning of the round. Fasten off.

Round 3: Join yarn in ch space, 3 ch, [2dc, ch1] in same space. *[3dc, 2 ch, 3 dc, 1 ch] in next space. [3dc, ch1] in next space. Repeat from * 3 times. [3dc, 2 ch, 3 dc, 1 ch] in next space. Sl st in 3rd of 3 ch at the beginning of the round.

Round 4 and all subsequent rounds: Continue as in round 3, with 2ch between clusters on corners and 1 ch between clusters on sides. Each round will have more clusters on the side. 


 (v1)tested: 8/20 CC.

Monday, August 15, 2011

How to Turn Babette Blanket Squares into a Babette Squares Scarf

Babette Squares Scarf - flip side
Babette Squares Scarf


My Babette Blanket squares had been sitting in a knitting bag for a really, really long time (April 2008!) My initial excitement about the project was long gone. I really didn't like the yarn, Plymouth Encore DK, because it was just to acryllic-y. And when I blocked the squares to get them to a place where they could actually be sew together the fabric seemed way too thin for a blanket or afghan.

Fortunately, at just about that time the Shanghai Guild, a group of devoted knitters and crocheters who meet weekly in Shanghai to make items for a variety of charities had a call fro scarves for a local senior center. I gathered up the squares I had and made a scarf.

If you want the original pattern for the Babette Blanket it was in the Interweave Crochet Spring 2006 edition. You can download it here for $6. If you want to make the whole blanket that would be a good option as it will give you the layout & how many squares you need.

If you want to save the $6 and know a bit about crocheting granny squares you can do it on your own. Using any granny square pattern make the following squares:

12 round squares: 1
8 round squares: 2
6 round squares: 9
4 round squares: 14
2 round squares: 17

(i.e. Do rounds one and two of your pattern and make 17 squares like that, alternating color combos in a random way. Do rounds 1 through 4 and make 14 squares like that, etc.)

Upload a pdf diagram of square placement.

For a crochet square pattern that looks a lot like the square in Babette Gramma Cookie's has one that looks very similar to me (I haven't tried the pattern myself so can't tell you how well it works.)

On the scarf pictured above, after I'd stitched it together, using black yarn, I did a row of single crochet all around, then did a round of ch5, sk3, ch5.

For alternate edgings, I heartily recommend Edie Eckman's book, Around the Corner.

Have a look at my posting that sharestips and techniques for working wtih Babette squares.


Friday, August 12, 2011

Knit and Crochet for Charity

When I find myself with extra time and leftover scraps of yarn on my hands I like to find groups that distribute hand made items to people in need. Online searches for these groups have been time consuming, not always easy to find, and often outdated, so I'll keep track of what I learn here, and update it as I learn more. If you have a group or project to share, please leave a note for me in the comments section and I'll add your info.

Projects with Specific Due Dates:

Martingale & Co is sponsoring a campaign called "Share the Warmth". They're not collecting items themselves, but to encourage people to knit, crochet & quilt for charity they're offering prizes to people who donate items to the group of their choice & then submit photos to Martingale. The random drawings will be held Thursday, December 1, 2011, or when the tally reaches 3,500 donations, whichever comes first. Here's a link with all the details. You can send pictures of your donations to: Sharethewarmth@martingale-pub.com or kburns@martingale-pub.com


Smooth Fox Crochet is sponsoring a 2011 Winter Charity Square Drive with prizes. They're looking for 6, 7 or 12" squares. Check the link for complete details. Deadline is January 14, 2011.


Create scarves to gift to the athletes, coaches, families, volunteers and supporters of each participating Special Olympics Program. at the 2011 Special Olympics. They're accepting scarves made out of specific yarns:
Red Heart Super Saver 387-Soft Navy
Red Heart Super Saver 319-Cherry Red
Red Heart Soft 4604-Navy
Red Heart Soft 9925-Really Red
The colors as well as the size (6" x 54"-60") of the scarves will be the same for all participating Programs in the 2012 Special Olympics USA Scarf Project. They have 4 free patterns on the site, although they welcome any design. Individual states have organized distribution of the scarves, with a list of shipping addresses and due dates here. Due dates vary by state, and fall between Dec. 12, 2011 to Mar. 5, 2012. The yarn was available today at my local Joann's (and on sale even!) but you can also order online directly from Red Heart at a discount. You can post photos of your finished work, and see what others have made, on their facebook page.


Groups That  Continually Accept Items  


Shanghai Guild has a special place in my heart as I was lucky enough to join  in their weekly knit-ins during my time as a trailing spouse in Shanghai. They make assemble beautiful blankets that are distributed to orphanages in China; create dresses for stuffed bears that are sold to benefit young heart patients and make scarves, hats and other gifts for elderly residents of Shanghai. They're happy to accept 10" knitted or crocheted squares and have people in many countries that collect items and get them to Shanghai.


Knit4Charities Inc. is an Australian Internet based association of dedicated knitters and crocheters who give warm clothing and comforting items such as blankets and toys to needy people throughout our Country. 
They have a huge following and ongoing projects that serve a variety of charities.


In memory of their sister, two women have launched "Kaps for Kendall."
From their site: "Our goal is to raise money to fight Fanconi anemia, the disease that took the life of our sister, and to provide special hats for kids and adults, who have lost their hair from chemotherapy and radiation.


If you have a group or know of one, leave info in the comments section and I'll add you to this list."

Friday, February 25, 2011

Serape Inspired Cowl


After finishing a baby blanket in this yarn the wrong side reminded me of the Mexican serapes I used to see in Tijuana. I liked the idea of the pattern as a cowl, which is currently my favorite thing to grab and throw on as I dash out the door. It’s freeeeezing now in Shanghai and this is a great final layer.
Used leftover bits from 13 colors of yarn. Knit a 30” tube in garter stitch.
These days nothing seems finished to me unless it’s got a crocheted edging. Thank heavens for Edie Eckman’s “Around the Corner”. I used pattern number 2 at the lower edge; and pattern number 20 on the top edge. I did round 2 in purple and round 3 in green, adding a 3 stitch picot at the top of each scallop. This is one of my most used stitch dictionaries, with easy to read written instructions and charts that make customizing it to work for your project easy.   

Friday, December 10, 2010

Knit Headband with Crocheted Flower

Something to keep Delaney's ears warm at school. We saw a headband at Anthropologie that was similar and much more expensive and not nearly as soft as the ball of yarn it took to make this.

Wednesday, December 8, 2010

Crochet Flower Motif Pattern


Ch 51
Row 1: (dc, ch 2, dc) in 5th ch from hook, *ch 2, skip 2 ch; dc, ch 2, dc in next ch* to last stitch, dc in last ch
Row 2: ch 3, turn, (2 dc, ch 2, 2 dc) in first ch-2 space, *skip next ch-2 space, (ch 2, 2 dc, ch 2, 2 dc) in next ch-2 space, repeat from * to last stitch then dc in last dc
Row 3: turn, *9 dc in next ch-2 space, (sl st, ch 1, sl st, ch 1) in next ch-2 space, repeat from * to end of row, tie off. Weave in end.

Flower shown here is done with Cascade Yarns Eco Duo and a size "G" hook.

Friday, December 3, 2010

Freeform Afghan #2

Finished! My second attempt at a Freeform Blanket


For weekly notes and photos on how this thing came together click on read more below

Friday, October 1, 2010

Freeform Afghan #1


Blanket made from scrumbles collected during a round robin swap. Finished size is 50" x 72".

Wednesday, September 29, 2010

Sari Silk Bolsters

Sari Silk Bolsters
I knit a tube then attached crocheted circles to each end.

Saturday, May 29, 2010

Freeform Crochet Fun & Frivolity Crochet-a-Long

In April 2010 a group on Ravelry started a Crochet-a-Long with weekly instructions submitted by different designers. I'd participated in a similar project earlier in the year & thought it was a great way to go about crocheting. I completed the first four weeks. Then, as I was packing up to leave Shanghai for the summer it was just too much to fit in my suitcase. So I washed it, cut it up, felted it and cut it up some more and ended up using the pieces in a bag.

Following are the instructions as they appeared on the Ravelry site and pictures of what I did. My notes are in blue.

Saturday, May 22, 2010

The 2010 International Freeform Guild's Show: Somewhere in My World

My entry into the International Freeform Guild show.

It’s kind of boring for freeform. It did serve my purpose of figuring out how to build up crochet into a form. And it is reminiscent of the hill I see out my window.

The main page of the exhibit is quite intriguing and the variety of techniques used and approaches to freeform is truly inspiring.

Friday, May 21, 2010

Crochet Spiral Motifs


3 Color Spiral Motif


Instructions:
Form an adjustable ring by looping the end of A behind itself putting the yarn tail behind the working yarn (the yarn coming from the skein); hold the end against the loop and insert the hook in the center of the ring. Work stitches over both strands of yarn.


Round 1: With A, CH 1, (SC, HDC, DC) in ring, remove hook from loop (pull loop long so stitches don't unravel); join B to ring and CH 1, (SC, 2 HDC) in ring, remove hook from loop; join C to ring and CH 1, 3 SC in ring, place marker in last stitch to mark the end of the round (9 stitches). Do not remove your hook from C. Pull the yarn tail to tighten the ring.


Round 2: Continuing with C, [2 SC in next stitch] 3 times, remove hook from loop and reinsert in loop of A; with A, [2 DC in next stitch] 3 times, remove hook from loop and reinsert in loop of B; with B, [2 HDC in next stitch] 3 times (18 stitches). Note that a pattern has been set up: You will always work C into A, A into B, and B into C. It is very useful to mark the last stitch of the round, because the end is actually in the middle of a section of a particular color.


Round 3: Continue as above using DC - with 1 or 2 DC in each stitch as needed to keep piece lying flat. Continue until desired size. To finish each color, do 2 HDC, 2 SC and slip last stitch.