Showing posts with label How-to. Show all posts

Thursday, January 30, 2014

Textured Slouchy Hat - Free Knitting Pattern

Textured Slouchy Hat - Free Knitting Pattern

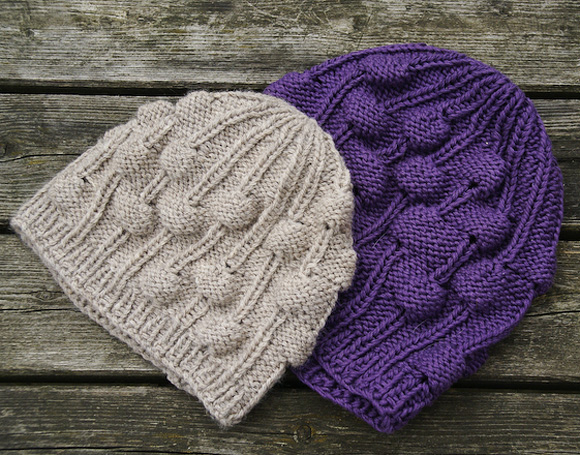
I created a new version of my slouchy knit hat in response to my son's comment that the original was too "girly". I used a tweedy yarn - Online Linie 245 and a simple textured stitch.

Click here to download a free pdf file of the pattern.


Monday, March 18, 2013

Crochet Stitch Instruction:Woven Stitch


I find myself using this stitch over and over. It makes a nice thick fabric that's great for pillows, dish cloths and coasters.


Even number of stitches.
Row 1: SC in 2nd ch from hook, *1 CH, skip 1 ch, 1 SC in next ch, repeat from * to end, turn
Row 2: 1 CH, skip first sc, *1 SC in 1 ch sp, 1 CH, skip 1 sc, repeat from *, ending 1 SC in 1 ch, turn
Repeat row 2.


Pattern adapted from “The Crochet Stitch Bible”, Betty Barnden, which is one of my favorite crochet stitch anthologies. No matter what I'm looking for I always seem to find something that I can use.

Wednesday, June 13, 2012

My Favorite Free Patterns: Hats to Knit & Crochet

A list, with photos, of my favorite free patterns to knit or crochet hats.There are so many lists of free knit and crochet patterns out there, but they usually don't have photos. So here's a quick list of what I think are the best free patterns out there. Leave me a message below with a link to your favorite if you'd like to add it here.

Easy Slouchy Hat
This is the hat I've knit the most. It can be finished in an afternoon and using variegated yarns make it look much more complicated than it actually is. The pattern is available as a free Ravelry download. It's shown here in Twisted Sister Jazz yarn. I used two colors (60 & 69) and alternated with two rows of each color throughout the hat. I've also seen it knit up in Blue Sky Alpaca Organic Cotton (if you're on Ravelry you can see a photo here), Malabrigo Rios (Ravelry photo here), Debbie Bliss Andes Alpaca Silk (Ravelry photo here).

La Parisenne
I love the zigazaggy stripes of this one. the pattern calls for a yarn called SockPixie Sock yarn. The free knitting pattern for this beret can be downloaded here.It appears to be knit with an artisan dyed yarn that isn't available currently. I of course will go to one of my favorite yarns for striping, Noro Kureyon Sock Yarn or Noro Silk Garden Sock Green/Aqua/Brown.

Undergrowth Hat on Knitty
I love Knitty. But I even find it frustrating. Entering a search for "hat" brings up a list with no pictures. And of all the hats on the site, Undergrowth is the one I want to remember. (Download for Undergrowth Free Knit Hat Pattern is here.)  It calls for 1 skein in each of two colors of Brown Sheep Nature Spun Sport (colors pictured are #103 Deep Sea & #N003 Grey Heather.)


Lollipop Hat by Brittany Tyler
This is a fun hat that looks like it will be fun to knit. The instructions, available to download from the Tangled webzine, say it can be knit in up to 8 different colored stripes, making it a good project for using up leftover bits.

Tortora Hat on Knitty
Bobbles are one of my favorite stitches. Another Knitty option (free download for the knitting pattern is here), this knit hat mixes bobbles and stripes in an interesting way. It calls for 1 skein of Lana Grossa Alta Moda Alpaca Yarn and has versions for both a typical beanie and a slouchy toque.

Hatticus by Susanna Celso
A great cable pattern knit out of a bulky yarn, the Hatticus knit hat by Susanna Celso is available as a free download on Ravelry with notes on her blog. It's shown here in Cascade Magnum, requiring about 80 yards according to her notes.

Thursday, March 15, 2012

Crocheted Granny Square Bag

Crocheted Granny Square Bag with Striped Strap


I used odds and ends of needlepoint wool & washed it in warm water in the machine to full it a bit. I found a piece of vintage knit boucle from my grandmother’s stash for the lining. Yes, it took me three years to finish this one… A day to crochet it, a day to line it and 3 years of it lying around in the “to do” pile.

The squares are made by doing 5 rounds of a traditional granny square pattern as follows:

Main color is used for Rnd 5 to edge each square.

Make 12 squares using different color combos (no two squares alike!) on the first four rounds


Ch4, join with sl st to form a ring.

Rnd 1:Ch 3, 2 dc in ring, ch 3, * 3 dc in ring, ch3. Rep from * 2 more times. Join and break off on this and every rnd.

Rnd 2:Join yarn in any ch-3 sp, ch 3, work 2 dc, ch 3 and 3 dc in same sp, * ch 1, work 3 dc, ch 3 and 3 dc in next ch-3 sp. Rep from *2 more times, end ch 1.

Rnd 3:Join yarn in any ch-3 sp, ch 3, work 2 dc, ch 3 and 3 dc in same sp, * ch 1, 3 dc in next ch-1 sp, ch 1 work 3 dc, ch 3 and 3 dc in next ch-3 sp(corner). Rep from * around end ch 1.

Rnd 4:Join yarn in any ch-3 sp, ch 3, work 2 dc, ch 3 and 3 dc in same sp, * (ch1, 3 dc in next ch-1 sp) twice, ch 1, work 3 dc, ch 3 and 3 dc in next corner sp. Rep from * around, end ch 1.

Rnd 5:With Main Color, sc in each dc and in each ch-1 sp, working 3 sc in ch-3 corner sps.

Create the strap by doing random colors of single crochet in the desired width (I did a 2" width) and length.

Assemble the bag by first joining 6 squares together for the front, and 6 together for the back.

Sew the ends of the strap together, Then sew onto the front and back. Cut lining to fit and attach with blanket stitch.

These are my working notes, and hopefully correct, accurate and understandable. And feedback is welcomed!


Wednesday, November 2, 2011

Featured on Crochetvolution

A photo of my afghan is featured in an article - 5 tips for getting started in Freeform on Crochetvolution.

Click here to see weekly notes on how the blanket all came together.


Tuesday, September 27, 2011

Free Knitting Pattern: Sari Silk Pillow on the Bias

Recycled Sari Silk Knit Pillow


Garter stitched squares are knit on the bias and sewn together to create this pillow cover. This is a great project for the beginner who’s ready for something a bit more challenging than a scarf. You’ll practice increasing and decreasing. And there’s so much going on with the yarn that your stitches don’t have to be perfectly even, and assembly is a breeze. No neat sewing required!

KNITTED MEASUREMENTS:
18” Square

MATERIALS:
18” pillow form
1 pair US 7 (4.5mm) needles

GAUGE:
16 sts and 14 rows to 4”/10cm

NOTES:
The recycled silk yarn is uneven in both size and color throughout the balls. I prefer to buy skeins (instead of balls) so that I can see the colors and control how the color plays out. If you can’t find skeins, you can either unwind the balls, or, just let the color come naturally and be surprised!

SQUARES:
Cast on 3 stitches.

Increasing:
Row 1 (Increase Row): Knit into front and back of first stitch. Knit to last stitch. Knit into front and back of last stitch.

Before turning work, place a safety pin on the first stitch of this row. The safety pin is placed so that you know when to increase. Whenever the pin is on the right-hand side of your work, you increase at each end.

Row 2: Knit across row

Repeat rows 1 and 2 until you have 47 st on the needle (edges should measure 9”.)

Knit across row.

Decreasing:
Decrease Row 1: K2tog, k to last 2 st, k2tog.

Decrease Row 2:Knit across row.

Repeat these tow rows until 3 st remain. Pull yarn through 3 stitches and knot.

Make a total of 8 squares.

ASSEMBLY & FINISHING:
Sew together 4 squares for front, and 4 for back.

Block to measurements.

Sew three sides together. Insert pillow, sew remaining side.


Monday, August 29, 2011

How to Figure How Many Granny Squares You Need For an Afghan


There are a number of things you need to keep in mind when figuring how many squares you'll need to make an afghan or blanket.


1. Make several squares in the pattern you've chosen.
2. Block and measure the squares. Blocking is especially important when assembling a blanket out of squares. It's one of the few times I actually block my work. The time and headache saved in assembly more than makes up for what you spend blocking. I have photos and written instructions on the process I follow here.
3. Decide how you're going to assemble your squares. The assembly method you choose will affect the finished size of your blanket. Whipstitching or single crocheting the blocks together won't afect the size much. But joining with a decorative stitch can affect the outcome. Even just a 1/4" added on a join can add 4 - 5" to the overall size of a king blanket using 4" squares. So if you're choosing something fancy like that you're going to have to piece a few together to figure out what the size is of your blocked, assembled square.
4. Divide the length and width of the blanket you want to make by the size of your finished squares (including whatever you added for assembly). This probably won't be a round number, so you'll have to decide whether you want to round up and make a slightly larger blanket, or round down & make a slightly smaller blanket. (Keep in mind that if you round down you can add a decorative border.) Then multiply the number of squares you need across by the number of squares you need for the length and you'll have the total number of squares you'll need to make. 

Monday, August 1, 2011

Upcycled T-shirt Needle Case

The front of the case.

I found an old t-shirt of my daughter's that my sister had decorated during her Swarovski period. Delaney had been regularly raiding my tool drawer in pursuit of her hew love of bookmaking. Knowing she'd be going back to school after Christmas I decided to kit her out with everything she'd been using. I found some squares of felt, some buttons, embroidery thread, bits of ribbon & scraps of fabric.

Inside the case
I layered 3 pieces of felt together.
Then I made a pocket on the top from the sleeve of the t-shirt and filled it with embroidery floss.
Under the purple flap is a bone folder.
The scissors are attached with ribbon and put into a pocket made from oilcloth (the points of the scissors poked through regular cloth.)
I cut a hole for the awl & embroidered around the edge so it would be stronger.
I made a little pocket out of another bit of the t-shirt with a crystal flower and tucked in a needle-threader.
I stitched a piece of ribbon down to hold safety pins.
Back of the case
At the top is the flap that holds in the bone folder.
The paisley is just a decoration.
I used buttons to strengthen the corners where the pockets are sewn on.
And the whole thing closes with a bit of elastic that catches on a button.

She loves it. It's portable, has everything she needs in one place and everything's tied down with ribbon so she doesn't misplace it.

Thursday, May 20, 2010

How to do a Jogless Join When Knitting in the Round

I can never remember how to do this, or find the instructions when I'm looking for them. Here are notes I copied up from a project I can't now find on Knitty. (Yes, the primary purpose of this blog is to get me organized in some sort of fashion...)


You may want to do the famous "jogless join" to avoid that little "step" that happens when you switch colors while working in the round. To do this, work one round in the new color. On the first stitch of the second round, pull the stitch below that first stitch (in the old color) up onto the left needle and knit it together with the stitch in the new color. Keep knitting in the new color. Lovely.

Wednesday, March 5, 2008

Babette Blanket - How to Crochet Better Granny Squares

I'm a self taught crocheter. I used a book to learn, and I didn't read very much - just looked at the pictures. And I really only learned enough to do free form crochet - I've only done a couple of crochet projects using a pattern - so I haven't really tried to understand very much.

Following are a few things I learned when making the Babette Blanket. The pattern was featured in the Interweave Crochet Spring 2006 edition. You can download it here for $6.

I'm assuming that's the reason I always have so many problems translating what the Babette Blanket pattern is trying to tell me what to do. There are always so many options on how to do a simple action. Like 2sc. Do I go into the front loop, the back loop, through the chain but not the bar below it, throught the chain & the bar? Each option gives a completely different look to the stitch. When you combine that with all the options for all the stitches in combination and then throw in needle size and tension it's taking me days to get my gauge swatches done. I also find myriad other little issues as I'm working that aren't addressed in the pattern. I'm guessing it's because I never learned "the standards". Or maybe it's just that I'm absurdly picky and have very strong opinions about what I like & I don't like. And then there's the whole problem of remembering what I've decided to do. Usually there are sticky notes on top of sticky notes stuck all over the pattern. Most of it is a matter of personal preference. But in the end consistency is important to me. (Although with so many squares I'm sure I can include all these different techniques into the blanket and no one will notice but me...)

So here's a list of my issues & actions I've decided. I've got to write it down or I'll never remember what I've decided & will be lost when the project gets pushed aside for a while as something new catches my eye....

1. Double Crochet: go through the chain or the chain & the bar?

Here are squares done each way:
The square on the left is just through the chain - not through the bar below the chain. the square on the right is through both the chain & the bar. Needless to say - the first thing that is very apparent is that blocking is crucial. I have no idea why the right square is so much more "tweaked" than the left square. Looking at the two squares side by side I couldn't see much of a difference so decided to block them up & call it a day.

After blocking it was easy to see that I prefer to dc under the chain but above the bar. I prefer the lacey-er look - and there's a bit of a bumpy ridge on the right square that I don't like the feel of. Plus, the rows seem more apparent and the whole structure is more pleasing to me.

2. Blocking - do I really have to?

As soon as I saw the squares this morning I knew the answer to that one. The blocked squares look so much better - and will be so much easier to assemble.

I've got my blocking down - I've got a couple "Quilter's Cut & Press" boards that I picked up at JoAnn's with a 1/2 off coupon. They're just big enough to be useful - but not so big as to be awkward. They stash behind my desk & fit perfectly on the kitchen counter. They've got a grid printed on them so I can pin to perfect squares. As the end of each day I grab the board, pin up the squares, hit them with a little steam from the iron and set them aside. Next morning I wake up to perfect squares. As far as I'm concerned a squares not finished until the last end is woven in & the square is blocked. I crochet the ends in as I go - so all I've got at the end is the last bit I tied off.) If I waited until the end to weave in the ends & block the squares I can say with certainty the thing would never get assembled....


3. What size hook?

The pattern calls for "E". Plymouth Encore DK yarn I'm using says "F" or "G". I used a 5 needle when I knit a baby blanket with the yarn and that looked good. My crochet tends to be pretty loose - so I started with an "E". I realized the squares have to be relative in size. Two 2-round squares have to equal one 4-round etc. The first few squares (2 round) looked good - pretty lacey after blocking. The 4 round square required a fair bit of stretching to get to size, but I thought I could make it work. The 8 round square was impossible to block out to the full size it needed to be. Pulled out the "F" hook. The 2 round squares are a bit bigger than ideal - but the 4's on up are great. I'll go a bit tighter on the 2 round squares & try to be looser on the bigger squares.


4. What's going on where the colors join together?


This is how it looks when I "join with a sl st in top of beg ch-3". The color from the row below goes into the color of the new row. Fixed this by joining the new color, then slipping the stitch in the top of the beg ch-3. Probably something they teach in Crochet 101...


5. What's going on with the holes where the round ends?


For some reason I'm getting a hole where each round ends. I solved this by doing Ch 2 instead of Ch 3 at the beginning of the round. No idea why it works, but it does...


6. What's going on with the corners?

There's an extra little loop showing up in my corners. After looking at it I realize it's because my dc is going under the chain, but over the bar. That's the bar showing through. Solution: in the corner I do 2dc, ch2, 3dc.


Now my corner is clean!


So here's my version of the instructions combining all my changes:

Using "F" hook:

Round 1:
Work over tails as you go!
Ch 4.
(dc, [ch2, 3dc] 3x, ch2, dc) all in 4th ch from hook.
Join with sl st in 3rd ch (hook below the chain, but above the bar) of beg ch4. (For color change: attach new color, then sl st in 3rd ch (go below the chain but above the bar)of beg ch4) Do not turn. (Run the tail up one of the crochet stems to the chain level so you can crochet over it on the next round.)
Check work: each side should have 3 stems. Each corner should have 2 chains.

Round 2:
Ch2. dc in next dc (hook below the chain, but above the bar)
in corner space: 2dc, 2ch, 3dc.
1dc in each of next 2 dc spaces (hook below the chain, but above the bar).
Continue until the beginning. Finish as in round 1.
Check work: each side should have 7 stems. Each corner should have 2 chains.

Continue on in this pattern.

Hopefully this will jog my memory when I've been away from the project for awhile!